Showing posts with label Recipe. Show all posts

Thursday, May 19, 2022

Recipe time: Chocolate Chip Banana Cake

Chocolate and banana, is there anything better than this heavenly combo??

Chocolate Banana Cake appeals to most people I know and this is a recipe I make frequently because it always disappears quickly! It is simple to make and my favourite way to use up overripe bananas so they never go waste! (makes me feel heroic!).  The melted butter along with ripe bananas makes the crumbs super moist and melt-in-the-mouth feel. This recipe doesn’t require a mixer, an easy one bowl recipe, good for your health, makes a great go-to breakfast or snack and doesn’t require a frosting!

I am sure you will enjoy making this recipe because it has all its goodness and super quick to make! Let me know if you do try!


Ingredients
• 1 3/4 cups all-purpose flour
• 1 cup granulated sugar
• 3/4 cup cocoa powder
• 3/4 teaspoon baking soda
• 1/2 teaspoon salt
• 2 to 3 bananas (more ripe the better!)
• 3 tablespoons sour cream
• 1 tablespoon milk 
• 2 eggs
• 6 tablespoons melted butter
• 1 teaspoon vanilla extract
• 1/4 cup chocolate chips

Instructions
• Preheat the oven to 350 degrees F (176 C), grease and line a loaf pan.
• Whisk all the dry ingredients- flour, sugar, cocoa powder, baking soda, and salt in a large bowl.
• Mash the bananas in a smaller bowl, and stir together with the sour cream, milk, eggs, melted butter, and vanilla extract.
• Add the banana mixture to the dry ingredients in the larger bowl, add chocolate chips and fold together just until combined.
• Pour the batter into the prepared loaf pan, sprinkle the chocolate chips on top, and bake for 1 hour 15 minutes, until a skewer inserted in the thickest part comes out clean or with a few moist crumbs.

• Cool for about 20 minutes in the pan, and then remove it to a wire rack to cool completely before slicing.  


Above pictures are copyrighted Tickled by Inspirations.


Saturday, April 3, 2021

Hot Cross Buns Recipe and Happy Easter

There’s nothing better than the smell of fresh homemade Hot Cross Buns wafting through your kitchen. Warm bread + fragrant spices = heaven! The best part is that they are easier to make than you think and taste heavenly. I hope you get to try this out! Its so therapeutic to bake these gorgeous buns! You can even try out without piping the cross on these buns and skip that step all together.

I know nothing much has changed since last Easter... its around the same time when Covid started and its been a year... and we are still fighting this pandemic... and we all should be grateful that we have come this far.

Easter reminds us that hope must never be lost for as dark as the road may seem, there always lies light at the end of it. I hope this Easter will fill your home with peace, faith and joy! Wishing you all a Happy and Blessed Easter!


Here is the recipe to make these hot cross buns:


INGREDIENTS

Buns

·         2 packets dry, instant or rapid rise yeast, 1/2-oz. or 14 grams (just over 1 tablespoon)

·         1 1/2 cups warm milk (375 ml)

·         3/4 cup superfine sugar (130 grams)

·         4 1/2 cups bread flour or plain/all purpose, (645 grams) PLUS up to 1/4 cup extra if needed

·         2 teaspoons  mixed spice

·         1/2 teaspoon salt

·         1 cup raisins, (5.4-oz. or 155 grams)

·         zest of an orange 2 tablespoons

·         1 large egg 

·         1/4 cup butter, melted and cooled slightly (2.1-oz. or 60 grams)

To draw the Cross

·         1/2 cup all purpose or plain flour, (2.6-oz. or 75 grams)

·         5 tablespoons warm water

·         1/2 teaspoon pure vanilla extract

Glaze

·         1 tbsp jam, (orange marmalade or apricot jam – I used orange)

·         2 teaspoons boiling water


Method

1.       Mix yeast, milk and 2 teaspoons of the sugar in a small bowl to activate. Set aside until frothy on top, about 3-5 minutes.

2.       In a large bowl and combine flour, remaining sugar, all spice and salt. Give those dry ingredients a light whisk to combine, then add in the raisins and orange zest.

3.       Create a well in the centre of the dry ingredients; pour in the yeast, cooled melted butter and egg.

4.       If you are using a standmixer, Mix until a smooth elastic dough forms, about 5 minutes on low speed (setting 2). Add extra flour, 1 tablespoon at a time while mixing, ONLY if needed, until the dough JUST pulls away from sides of bowl (not too sticky). Or if you are using your hand to mix, knead the dough for about 10 minutes.

FIRST RISE

Lightly oil the same mixing bowl you worked with. Place dough inside bowl, cover with plastic cling wrap and place a dry tea towel over the top. Leave in a warm place to prove for 1-2 hours, or until doubled in size.

Shape into Buns

1.       Line a deep 9 x 13-inch (31cm x 23cm) baking tray with baking paper. You want a piece long enough to create a slight over-hang for easier lifting once baked. Set aside.

2.       Remove cling wrap and punch down dough with fist to deflate and knock the air out. Transfer dough to a clean, lightly floured work surface.

3.       Knead dough for an additional minute or two to get remaining air out. Shape dough into a log and divide into 12 equal pieces (each piece should weigh about 4-oz. or 116-119 grams). Briefly roll each piece into a ball, evenly spacing them out on the tray as you go into rows of 3 x 4.

SECOND RISE

1.       Preheat oven to 180°C.

2.       Cover tray with plastic wrap; place dry tea towel over the top and leave in a warm place for an additional 30 minutes, or until doubled in size.

Pipe the Crosses

  1. Mix flour and water to a thick-ish paste (like a thick pancake batter)
  2. Grab a sandwich-sized ziplock bag. Snip corner to measure a 3mm hole (0.1-inch). Spoon paste into bag; carefully press the air out and SEAL the top. (Test hole is big enough by squeezing out some paste into a bowl first. If you can create a small straight line, you're ready to make your crosses. At this point you can add a little extra water to the paste ONLY IF needed).
  3. Remove cling wrap and slowly pipe crosses onto buns. You want some paste to fall into and hug each roll/crevice so while they bake and rise up, the crosses don't break).

Bake

Place buns into preheated oven and bake for 22-25 minutes, or until deep, golden brown on top.

Glaze

1.       Transfer buns to a wire cooling rack.

2.       Mix jam  and boiling water together in a small bowl. Brush buns over with glaze, then leave to cool. 

3.       Allow to cool to just warm to the touch before serving.


Image copyright Tickled by Inspirations


Monday, December 7, 2020

Recipe Time: Poached Pears Recipe

If you want to make a sophisticated dessert that looks amazing, has no calories, packed with tons of flavour and easy to make then you should try this out. Poached pears are one of my favourite where my kitchen and home smells of aromatic spices. A treat that every family loves. I hope you enjoy making this for your friends and family and enjoy the countdown to Christmas!
 More recipes coming up for you to try!


Ingredients:

Vanilla Bean 1 stick

Zest and juice from a lemon

125 gm granulated sugar or half cup honey

Dried Hibiscus Flowers 20gm (you can subsititue this with wine)

Cinnamon Stick 1

Bay leaf 1

Star Anise 1

Cloves 2

4 small pears, peeled with stalks left on


Method

Put the hibiscus flowers in a saucepan with 600ml of water, lemon zest and sugar or honey, along with all the spices and bring to the boil. Reduce the heat and simmer for ten minutes until the sugar is dissolved and the syrup has a deep red colour. Strain the liquid through a sieve and add lemon juice.

Pour the hibiscus flavoured liquid into a large saucepan in which the pears can lie in a single layer. Bring the liquid to simmering point and cover with a lid. Cook the pears until they are tender. This could take between ten and twenty minutes depending on the ripeness of the pears. Check how well the pears are cooked by piercing the flesh with a sharp knife. Keep turning the pears while they are cooking to get an even colour.

Once the pears are cooked remove them from the pan with a spoon and lay them on a serving dish. Boil the cooking liquid until you have about 200ml left. Please check for sweetness and flavour adding a little more lemon juice or sugar if required. Leave to cool before serving the pears with the syrup.

Serve it on a bed of vanilla flavoured yogurt and crushed pistachio and serve.

Tip
If you have time leave the pears in the cooking syrup overnight for a deeper colour and flavour.


Aboves pictures are copyright Tickled by Inspirations 


Sunday, September 20, 2020

Recipe Time: Khow Suey

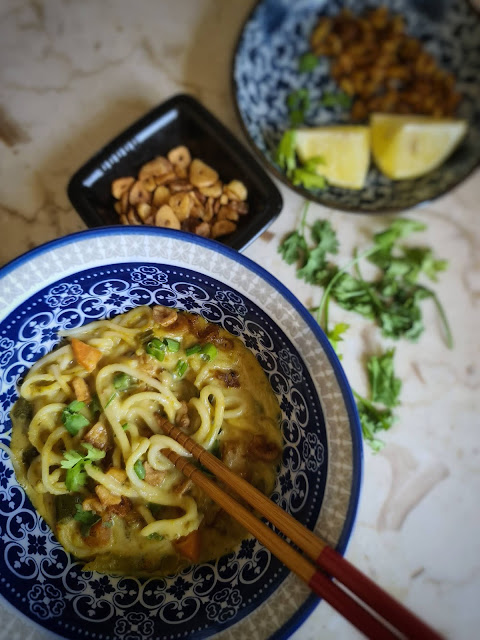
Khow Suey is a Burmese comforting noodle dish with coconut milk broth and served with an assortment of toppings like fried garlic, fried onion, cilantro...The dish is traditionally made with meat but this vegan version includes veggies cooked in the coconut milk soup which turned out so comforting and soulful. This is a regular dish in our home and I keep tweaking the recipe around as per my taste. The winter is approaching and what better dish to make!

 This recipe is absolutely simple to make and use your choice of veggies and meat. The recipe is adapted from @sprigandvine.in ... please keep me posted once you try out this recipe. Its always good to hear your feedback🤍


INGREDIENTS


To make the Khow Suey paste:

3-4 dried red chilli (Kashmiri or other), soaked in hot water for 15 minutes
1 medium sized onion, roughly chopped
6-8 cloves of garlic
1 tablespoon chopped ginger
1 teaspoon ground turmeric
2 teaspoons ground coriander
1 teaspoon roasted cumin powder
½ teaspoon ground black pepper


To make the curry:

2 tablespoons oil
3 heaped teaspoons chickpea flour
1- 1.5 cups water
2-3 stalks green onions, white parts only, finely chopped
1 cup diced veggies — mix of carrots, beans, zucchini, mushrooms
600ml coconut milk
2 tablespoons soy sauce
Salt, to taste
1-2 tablespoons lime juice


To serve:

Boiled rice noodles or wheat noodles, spaghetti or linguini

Garnishes: green onions, crispy fried shallots, fried garlic, crushed peanuts, chopped coriander leaves, red chilli flakes, lime juice


METHOD

Add all the ingredients for the Khow Suey paste in a food processor or grinder and make a smooth paste. Add a tablespoon or two of water to help the paste come together.

Heat the oil in a wok over medium heat. Add the curry paste and cook, stirring constantly, for 4-6 minutes, until the paste takes on some colour.

Add the chickpea flour and cook for another 3-4 minutes. Add 1 to 1.5 cups water and whisk fast and well, until no lumps remain and the mix is smooth.

Add the diced veggies into the wok and sauté for 5 minutes. Add coconut milk and a splash of soy sauce and bring the curry to a mild boil.

Reduce the heat and simmer for another 5-7 minutes. Season with salt. Taste and adjust seasoning. Turn off the heat and finish with a squeeze of lime to balance out the flavours in the curry.

To serve, divide the rice noodles/spaghetti among bowls. Top with a generous amount of the Khow Suey curry, and garnish with crispy fried shallots, fried garlic, green onions, crushed peanuts, chopped coriander, red chilli flakes and a squeeze of lime.


Above pictures are copyrighted 


Wednesday, August 26, 2020

Lemon Blueberry Cake

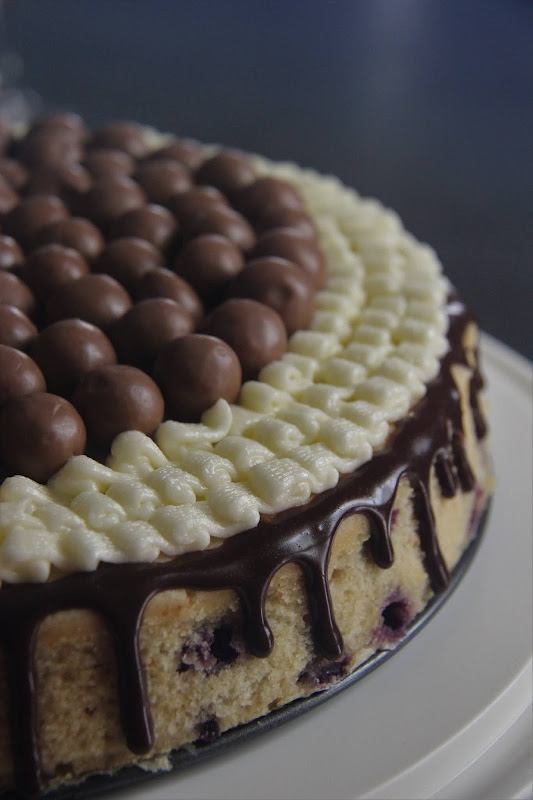
This easy lemon blueberry cake is a burst of beautiful flavours and I call this a sunshine cake. Its moist, tender and bursting with lemon flavour and blueberries. It’s a great combo of flavours and a great show stopper dessert. I am going to share this recipe which didn’t fail me in my first shot. Try it out and do let me know how it turns out! This cake goes well with cream cheese frosting or buttercream. But I love it with Chocolate… because nothing can go wrong with chocolate!


This recipe is adapted from Sally’s Baking Addiction


Serves 10 to 12


Ingredients

1 cup softened unsalted butter
1 and 1/4 cups granulated sugar
1/2 cup light brown sugar
4 large eggs
1 Tablespoon vanilla extract
3 cups all-purpose flour 
1 Tablespoon baking powder
1/2 teaspoon salt
1 cup buttermilk
2 Tablespoons lemon zest
1/2 cup lemon juice (3 medium lemons)
1 and 1/2 cups blueberries, fresh or frozen
1 Tablespoon all-purpose flour (to coat blueberries)


Method:


Preheat oven to177°C. If you want to make a layer cake grease three 9-inch cake pans, line with parchment paper, then grease the parchment paper. I used one 12inch pan.

Make the cake: Using a handheld or stand mixer with a paddle attachment, beat the butter on high until creamy – about 1 minute. Add granulated and brown sugars and beat on medium speed until creamed, about 2-3 minutes. Add eggs and vanilla. Beat on medium speed until everything is completely combined, about 2 full minutes.

In a large bowl, whisk together the dry ingredients - flour, baking powder, and salt. Slowly add the dry ingredients to the wet ingredients. Beat on low speed for 5 seconds, then beat in the milk, lemon zest, and lemon juice, just until combined. Toss the blueberries with 1 tablespoon of flour and gently fold into the batter. Batter is extremely thick. So do not over-mix as over-mixing will lead to a dense textured crumb.

Spoon batter evenly into 3 prepared cake pans. If you are only using 2 cake pans or 1 cake pan, your bake time will be longer. Bake the three layers for about 21-25 minutes or until a toothpick inserted in the centre comes out clean. Remove from the oven and allow to cool completely in the pan before assembling and frosting.

You can frost it with cream cheese frosting or buttercream or chocolate. They all work well with this cake. 


Above pictures are copyrighted Tickled by Inspirations.


Wednesday, August 5, 2020

Coconut Baked Chicken

Any dish that is made in coconut milk is so flavourful. Today’s chicken dish is just succulent, high in flavor and has all the right spices in it! Everything depends on the thick creamy sauce. If you are a fan of Thai food or a fan of our authentic Kerala stew, then you should try this out.

Coconut Baked Chicken recipe is adapted from @swahilifood , do check her page for the original recipe which is equally good, among her other amazing recipes. Here is my version, it is super easy and a winner all the way!! I hope you get to try it out, trust me you will love it!


Ingredients:

1 whole chicken (or Chicken thighs)

For Marinade
Salt 1 teaspoon
Pepper powder 1 to 2 teaspoon
Turmeric half tsp
Chillie powder 1/2 teaspoon

To make the sauce
Butter 1 teaspoon
Oil 1 tablespoon
Cardamom 3 to 4
Cinnamon stick 2
Cloves 3 to 4
Peppercorns 1 tsp
Bayleaf 1 to 2
Minced ginger 1 tsp
Minced garlic 1 tsp
Chillie flakes 1 teaspoon
Turmeric 1 tsp
Coriander 2 tsp
Garam masala half tsp
Chillie powder or paprika 1 tsp
Coconut Milk 1 can
Chopped Coriander leaves - a bunch


Method:
Butterfly the chicken. Marinate the chicken well with the spices. Make sure there is enough salt. Fry the chicken in a pan with butter and oil on both sides of the chicken till the skin turns brown. Then keep aside the chicken in a baking dish.

To make the Sauce:
Remove the excess oil from the pan, leaving a little. Add the cardamom, cinnamon sticks, cloves, peppercorns and bayleaf and saute it. Then add the turmeric, minced ginger & garlic, chillie flakes, coriander powder and garam masala and saute it for a minute. Gradually add the coconut milk. I didnt have to add the whole can, I used 3/4th of it. Just warm it up and add chopped coriander leaves. Everything lies in the sauce. Taste and see of you need to add more spice. Pour this over the chicken. Cover the dish with foil and bake it at 200 degrees C for 45 minutes. Then remove the foil and bake it for another 10 minutes and serve it with bread, Chappati or rice.


Notes:
If you are using Chicken thighs the baking time will be less.


Friday, July 24, 2020

Roasted Cauliflower with Parmesan and Garlic


Roasted whole cauliflower with parmesan and garlic looks good on any table. Whole baked cauliflower can be a vegetarian main dish or a healthy low carb side dish. Its quick to make and high in flavour and no work needed! And it is drizzled with garlic parmesan sauce to enhance flavour. This is my favourite go-to cauliflower recipe and I hope you enjoy making it!


Here is the recipe:


Ingredients:

1 small or meduim head Cauliflower
1/3 cup Olive Oil
3 cloves crushed garlic
1/4 cup grated parmesan cheese (divided)
1 tsp dried basil
1 tsp dried parsley
1 tsp dried thyme
1/2 tsp or more Sea Salt 
1/4 tsp Black pepper
1/2 tsp Chillie flakes

Method:

Preheat the oven to 400 degrees F (200 degrees C).

In a small bowl, make the garlic parmesan sauce. Whisk together the olive oil, minced garlic, 2 tablespoons (28.3 grams) grated Parmesan (half of the total amount), chillie flakes, basil, parsley, thyme, salt, and black pepper.

Place the trimmed cauliflower head upside down (core side up) onto a dutch oven or a baking try. Drizzle half of the sauce over the cauliflower, tilting it to let it drip down the core and all around. Flip over and drizzle the remaining sauce over the top. Use a pastry brush to brush on any that had dripped down to the pan or didn't spread well.

Bake for 35-45 minutes, until the cauliflower is tender and pierces easily with a skewer, knife or fork.

Sprinkle the top of the cauliflower with the remaining 2 tablespoons grated Parmesan cheese. Continue to bake for about 5 minutes, until the cheese is browned.


Above picture is copyrighted Tickled by Inspirations


Thursday, July 16, 2020

Nutella and Orange Swirl Buns


I recently discovered that Nutella and Orange are a deadly combination and super addictive. These buns are so delicious and fun to make… and they are so pretty to look at! The dough for this recipe was so soft and moist and it came out so perfectly! And I must say that it is easy to make even though the process seems long. Please do try. This is a huge hit in our home and I look forward to baking more of these soon...  

This recipe is adapted from Anna Banana and I added my twist to it... 


Yield : 8 to 12 buns depending on the size

Ingredients
·      60 g unsalted butter cubed
·      250 ml milk 
·      15gm yeast
·      500 gm flour
·      100 gm caster sugar
·      1 egg
·      1 tsp salt
·      Nutella 5 to 6 tablespoon or more (please be generous with it!)
·      Orange Zest 1 to 2 tablespoon
Instructions

1.    Heat the milk in a small saucepan until lukewarm. If you are using dried active yeast, transfer about 150ml of lukewarm milk into separate jug and add 1 tsp of sugar. Stir to dissolve sugar and add active yeast. Stir it and set aside for 15 minutes to activate it. 
2.    Add cubed butter to your lukewarm milk, swirling the saucepan every now for the butter to melt and set it aside.
3.    In a bowl of a freestanding mixer fitted with hook attachment, mix the flour, sugar and salt. Once its mixed, add yeast, egg, milk and butter mixture. Mix together for 2 minutes on low speed. Increase the speed to high and mix for further 6-8 minutes until the dough is not sticking to the sides of the bowl. Transfer the dough onto lightly floured surface, roll into a ball and place in a clean, lightly oiled bowl. Cover with clingfilm and let it rise somewhere warm for 2 hours or more until its doubled in size.
4.    Remove the dough from the bowl into a lightly floured surface. Gently knock out the air from it and stretch it into rough rectangle shape. Using a rolling pin, roll the dough into large rectangle.
5.     The longer edge of the rectangle should be facing you and spread the Nutella over 2/3 of the rectangle, leaving 1/3 clean. (please be generous with the spread). Then sprinkle the orange zest over the Nutella spread. Fold the clean part of the rectangle towards the middle, then fold the other end of the dough on top of that. Using a rolling pin, roll it over the rectangle to flatten it out and to stretch the dough a bit. (please head to my Instagram page @tickled_by_inspirations, to see the process, it is saved in the highlights)
6.    Use a pizza cutter or a sharp knife to trim the edges of your rectangle. Slice the rectangle in half, then each half in half again, and again until you have 8 long strips of the dough. Starting at one end of the strip, rolling, tucking the end underneath. Place the rolled bun into baking tray lined with some baking parchment. Repeat the same process with all of the remaining strips.
7.    Cover the buns loosely with some cling film and set them aside to prove for at least an hour.
8.    Preheat the oven to 175C. Bake in the middle shelf of the oven for about 18 minutes or until golden brown and risen. Enjoy! Eat it warm.

Tips:
You can freeze these buns
You can sprinkle hazelnuts on the buns before baking for a nutty texture.

I hope you will enjoy baking these beauties and do drop a mail or a comment and let me know how it turns out!! Have a great and safe weekend!


Above pictures are copyrighted by Tickled by Inspirations


Thursday, June 18, 2020

Bow to Bao Buns


Bao buns are soft, fluffy and pockets of steamy goodness. They go perfect with any meat or vegetables like mushrooms with pickled vegetables, fresh herbs and your favorite sauces. It can be served as a side or as the main meal itself.... And what I love about this bread is that it doesn’t collapse under the pressure of steaming. These buns just made me swoon and are a family favorite now. These are easy to make with readily available ingredients. Try it out and trust me, you will keep making it!


Yield 14 to 16 buns

INGREDIENts
·         1/3 cup warm water
·         1/2 cup warm milk
·         1 tbsp active dry yeast
·         4 tbsp sugar, divided half
·         2 tbsp vegetable or canola oil
·         2 1/2 cups all-purpose flour
·         1/2 tsp baking powder
·         1/4 tsp salt

INSTRUCTIONS
1.       Combine warm water, milk, active yeast, sugar and oil. Whisk to let yeast and sugar to dissolve then let it sit for 5 to 10 minutes until the yeast activate.
2.       Meanwhile in a stand mixer and a bowl, combine flour, sugar, baking powder and salt. You could make with your hand too if you prefer.
3.       Pour the wet ingredients to the dry ingredients. Blend on a low speed to slowly incorporate all the ingredients together then on medium speed until it becomes a dough shape. Keep on kneading for 3 to 4 minutes on medium speed. The dough should be elastic and really soft and not stick to your fingers or on the mixing bowl.
4.       Once the dough is ready, shape it into a ball and place it back to the bowl, cover with a plastic wrap and let it rise in a warm place until it becomes triple size, about 2 hours. Let it sit for longer if needed as it had to rise well. 
5.       Place the raised dough on a working surface and roll it out to 1/4-inch thickness. Sprinkle flour only if you need to. Cut the dough 3 1/2-inch circle with a ring mold or glass or a wine glass. This recipe will make 14 o 16 baos.
6.       Lightly brush or spray oil on one surface of the baos and fold in half as a half moon shape. Gently press each bao with a roller and place on a parchment paper or coffee filter lined steamer so that it won’t stick to the bottom. Cover with a lid and let it rest for additional 30 minutes.
7.       Meanwhile get your steamer ready. Carefully place the steamer with the baos on top of boiling water wok/pot. Make sure water is not touching the baos. Cover and steam for 8 to 12 minutes. Please be careful when you open the lid of the steamer. You can serve this bao as a side or serve with a filling like I did!
I hope you all will enjoy making these and do keep me posted if you try. Have a great weekend everyone!


Above pictures are copyright to Tickled by inpirations