Monday, December 7, 2020

Recipe Time: Poached Pears Recipe

If you want to make a sophisticated dessert that looks amazing, has no calories, packed with tons of flavour and easy to make then you should try this out. Poached pears are one of my favourite where my kitchen and home smells of aromatic spices. A treat that every family loves. I hope you enjoy making this for your friends and family and enjoy the countdown to Christmas!
 More recipes coming up for you to try!


Ingredients:

Vanilla Bean 1 stick

Zest and juice from a lemon

125 gm granulated sugar or half cup honey

Dried Hibiscus Flowers 20gm (you can subsititue this with wine)

Cinnamon Stick 1

Bay leaf 1

Star Anise 1

Cloves 2

4 small pears, peeled with stalks left on


Method

Put the hibiscus flowers in a saucepan with 600ml of water, lemon zest and sugar or honey, along with all the spices and bring to the boil. Reduce the heat and simmer for ten minutes until the sugar is dissolved and the syrup has a deep red colour. Strain the liquid through a sieve and add lemon juice.

Pour the hibiscus flavoured liquid into a large saucepan in which the pears can lie in a single layer. Bring the liquid to simmering point and cover with a lid. Cook the pears until they are tender. This could take between ten and twenty minutes depending on the ripeness of the pears. Check how well the pears are cooked by piercing the flesh with a sharp knife. Keep turning the pears while they are cooking to get an even colour.

Once the pears are cooked remove them from the pan with a spoon and lay them on a serving dish. Boil the cooking liquid until you have about 200ml left. Please check for sweetness and flavour adding a little more lemon juice or sugar if required. Leave to cool before serving the pears with the syrup.

Serve it on a bed of vanilla flavoured yogurt and crushed pistachio and serve.

Tip
If you have time leave the pears in the cooking syrup overnight for a deeper colour and flavour.


Aboves pictures are copyright Tickled by Inspirations 


Thursday, November 5, 2020

Artist Of The Month - Raya Al Maskari

Raya Al Maskari, a quality management and auditor by profession is a prominent artist in Oman and I have been following her work for some time which is truly inspiring. Her drawings and sketches are so organic with absolutely no rules which makes it unique. Most of her portraits evoke emotions. She experiments a lot with deconstruction art and abstracts, mixing hand drawn and digital work. Her creative process is what attracted me the most. The other aspect of what drew me to her work is her fabulous humour sense and sarcasm through her doodles and cartoons. She subtly gives a beautiful message in each of her doodles through the different humorous scenarios.

Have a look at her fabulous work and let’s hear more from her about her inspiring art journey.


Tell us a bit about yourself

Raya Saleh Al Maskari, a visual artist and a graphic designer.  CEO founder of Omanspire, works as a media specialist, quality management and lead auditor.


How did your journey as an artist begin? Did you have any formal training or is it self taught?

I started working on my art since early childhood with support of my parents, and it grew as I grew older with consistent practice and learning continuously, grabbing every opportunity to polish my artistic skills. I took lessons and classes with number of academics and artists: Basics of drawing with Mrs Laila Al Elaqi a Tunisian artist and an art academic, I also took painting lessons with Mr Abdulhameed Al Zubeidi an Iraqi artist, currently taking classes in methods of creative imagination  and anatomy with Dr Nasaser Palangi Irani/ Australian  artist.

Participations:
Annual youth exhibition by the society of fine arts - Muscat 2010
Annual calligraphy exhibition - Muscat 2010
Art 100*100 - Bait Al Zubair - Muscat 2014
“Voices from within” art Exhibition 2015 - Muscat
Oman’s cultural night by Dubai’s cultural center 2016
Oman - Philippines national day tribute 2016
Colorful Novels art exhibition 2018

- Methods of creative imagination workshop by the National        museum & Dr Nasser Palangi 2019/2020


How would you describe your art style?

My artwork is a combination of various styles and techniques, which includes bilingual cartoons that reflects aspects of social and cultural life in a sarcastic humorous way. As well as different medium that combines digital and traditional materials that is mainly about figures, faces and emotions along with inspiration from Oman’s rich culture, mostly the contemporary side of it.

What's your inspiration for your art work?

Everything around me can be an inspiration, the colors of nature, plants, textures, memories of things around me, food! People also inspire me; I see a story behind every face.

What is the most challenging aspect about your work?

Recognition, especially by our local galleries as I got a better recognized abroad. Lack of materials, that’s another challenge that most of us face here, and even if some are barely available they come in unreasonable prices.

We also face endless challenges with clients who expect you to sell your artwork for cheap comparing it to the ones they find in furnishing stores, our intellectual rights as people take some of the artworks and remove your signature or make copies and resell it on products without the permission of the artist. The lack of appreciation and support throughout the media in general.

 What is your creative process like? And what keeps you motivated?

Well, creative minds don’t necessarily go in one route towards a creative process, it depends on the idea and the type of art you strive to create, along with the message you’re trying to deliver.

The challenges keep me motivated, every time I face a mishap I bounce back to come up with more. Resilience and the urge to make a difference are the driving forces towards my motivation.


Do you commission different projects? And how can people purchase your paintings?

Yes I do, though I usually sell the paintings I make, I rarely commission a painting or a portrait, people can contact me though my accounts on Facebook, twitter and instagram.


 What is your favorite art piece that you have done till date?

Oh that’s a tough question, it’s like asking who’s your favourite child. Every artwork has an experience of its own it’s a record of the perceptual message that I try to deliver visually, they are accumulative timeline of my progress in this field, and a chain that tells a story of my journey throughout my life.


 Any tips or words of wisdom to aspiring artists who want to pursue a similar career.

Before seeking for support, be worthy of it and it will come naturally towards you.

Your challenges are not obstacles. Never allow negativity to disable your creativity. Keep practising, and experimenting, in order to come up with something that’s purely and originally yours, its okay to copy in order to learn but it’s not okay to copy and be a copy of someone else.

You are a unique individual and that should be reflected in your work, don’t ever restrict yourself in a titled box of “art schools/ styles”, experiment and come up with your own. Artists are NOT meant to vanish between the crowds they are meant to outstand.

 If the local galleries rejected your work you can always go to social media platforms to showcase, exhibit and introduce your creativity not only to the local audience but also to the world. Opportunities are gems of life; grab them with everything you have.

 We all go through ups and downs in life but one should always remember that resilience is the key to growth. And if you don’t stand up for yourself no one is going to do that for you.


Thank you so much Raya for the powerful message you gave to the upcoming artists and for giving us a glimpse of your beautiful and inspiring us with your journey. If you wish to follow her for updates, please follow her on Instagram @rayaarts .


Monday, September 28, 2020

Home Tour - Residence of Rushika from California

Hey everyone… I hope this finds you all in good health and happiness, especially during this crazy COVID phase. And I hope we all continue to be safe. I am back with my favorite segment, Home Tour and today’s home tour gives all the good feels of a zen home.

Rushika Veerareddy, based in California, has graciously opened up her beautiful home for us to have a tour. She has created a beautiful oasis that exudes warmth, serenity and coziness. There is a beautiful mix and balance of ethnicity and boho chic in her décor style. I always believe that your home is an extension of your personality and here Rushika has reflected her personal style through the things she has collected over the years and displaying it in beautiful vignettes and wall décor. And what I loved about her home is that there is a good amount of pop of green in her space as she loves nature.

Let’s hear more from Rushika herself and gear up for a beautiful tour of her home.


  • Tell us a bit about yourself.


I am born and raised in Hyderabad. I met my husband, Dikpal in 2014 and moved to California shortly after. I am a bioengineer by day and a decor enthusiast at heart. We love to read and explore, be it places, food or ideas and are always chasing new experiences.  This is our first home together. It is a small 700 sq. ft. apartment in the heart of Palo Alto and is over 50 years old. It does have a bit of a vintage charm to it. We have lived here for a little over five years now. 


  • Where do you get inspiration to do up your home?


 A big part of my inspiration comes from nostalgia and history. I have always been a person who has kept pieces that have been a part of my life as memorabilia. Objects that remind me of my ancestors and loved ones. I’ve felt a need to treasure them. Through these pieces I wanted to keep their stories and memories alive. Eventually, I started collecting some vintage and antique curios, intrigued about their make, time in history, location, artwork and the interesting hands they might have passed on through. 

Hence, my inspiration also comes from traveling and looking at historical grandeur. 

And also Pinterest, Instagram. 


  • What's your favorite décor style?


My decor style is evolving. Currently, it is a mix of eclectic and modern bohemian. This is largely because I’ve had to work with my husband’s already existing pieces of decor. Pieces from our travels have been picked up without hesitation and have blended so beautifully across the house adding to the eclectic vintage charm.  

However, the aesthetic that appeals to me the most is a blend between the French chateau and Parisian chic style. I would eventually love living in a space like that, with high ceilings, lots of light and neutral backgrounds with pops of gold and color. 


  • What's your favorite décor element or accent in your home?


I am particularly obsessed with my brassware. Especially the brass candle stands. Absolutely love them and feel like I never have enough.


  • Do you have a favorite corner or space in your home? And why is it your favorite?


The year 2020 has been a year of a lot of introspection and zero travel. Not being able to escape outdoors, my current favourite space is the balcony area. It is my slice of green paradise and a chance to catch a bit of sun and breeze and have a lazy summer afternoon reading my favorite books. 


  • Any tips or advice for décor lovers out there?


    • Experiment with caution. I love the idea of an evolving decor style. However, decor is expensive. Think about what works for you and start slowly.
    • If you rent like me, visualize your space and think about what you like: art, books, pottery, pillows, rugs, etc. Start from there. Take your time to make it your home and add elements to it that you might keep. 
    • Living in small spaces has made me creative with storage. Find functional pieces of decor that can double as great storage to keep the “things that must not be visible” out of sight.
    • In the end, enjoy the process! Happy decorating. 


Thank you so much Rushika for opening your doors for me and my readers. There were so many inspirations to take away from your beautiful home!!

I hope you all enjoyed this home tour as much as i did... Stay tuned for more inspirations coming your way. Stay safe and take good care!


Sunday, September 20, 2020

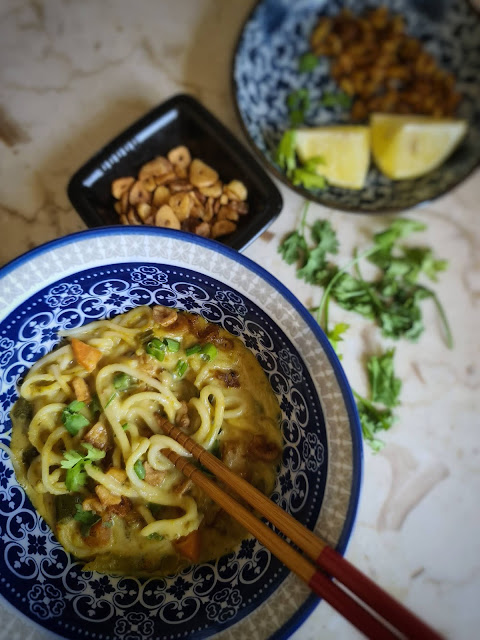
Recipe Time: Khow Suey

Khow Suey is a Burmese comforting noodle dish with coconut milk broth and served with an assortment of toppings like fried garlic, fried onion, cilantro...The dish is traditionally made with meat but this vegan version includes veggies cooked in the coconut milk soup which turned out so comforting and soulful. This is a regular dish in our home and I keep tweaking the recipe around as per my taste. The winter is approaching and what better dish to make!

 This recipe is absolutely simple to make and use your choice of veggies and meat. The recipe is adapted from @sprigandvine.in ... please keep me posted once you try out this recipe. Its always good to hear your feedback🤍


INGREDIENTS


To make the Khow Suey paste:

3-4 dried red chilli (Kashmiri or other), soaked in hot water for 15 minutes
1 medium sized onion, roughly chopped
6-8 cloves of garlic
1 tablespoon chopped ginger
1 teaspoon ground turmeric
2 teaspoons ground coriander
1 teaspoon roasted cumin powder
½ teaspoon ground black pepper


To make the curry:

2 tablespoons oil
3 heaped teaspoons chickpea flour
1- 1.5 cups water
2-3 stalks green onions, white parts only, finely chopped
1 cup diced veggies — mix of carrots, beans, zucchini, mushrooms
600ml coconut milk
2 tablespoons soy sauce
Salt, to taste
1-2 tablespoons lime juice


To serve:

Boiled rice noodles or wheat noodles, spaghetti or linguini

Garnishes: green onions, crispy fried shallots, fried garlic, crushed peanuts, chopped coriander leaves, red chilli flakes, lime juice


METHOD

Add all the ingredients for the Khow Suey paste in a food processor or grinder and make a smooth paste. Add a tablespoon or two of water to help the paste come together.

Heat the oil in a wok over medium heat. Add the curry paste and cook, stirring constantly, for 4-6 minutes, until the paste takes on some colour.

Add the chickpea flour and cook for another 3-4 minutes. Add 1 to 1.5 cups water and whisk fast and well, until no lumps remain and the mix is smooth.

Add the diced veggies into the wok and sauté for 5 minutes. Add coconut milk and a splash of soy sauce and bring the curry to a mild boil.

Reduce the heat and simmer for another 5-7 minutes. Season with salt. Taste and adjust seasoning. Turn off the heat and finish with a squeeze of lime to balance out the flavours in the curry.

To serve, divide the rice noodles/spaghetti among bowls. Top with a generous amount of the Khow Suey curry, and garnish with crispy fried shallots, fried garlic, green onions, crushed peanuts, chopped coriander, red chilli flakes and a squeeze of lime.


Above pictures are copyrighted 


Monday, September 14, 2020

Artist of the month - Shalini Kumar


Today’s feature is on an artist who accidentally started experiencing her passion for art, which took her to a beautiful journey and there was no turning back. Shalini Kumar, a well-known artist in the art community in Oman, did her doctorate degree in Economics from Agra University. She is a versatile self-taught Indian artist based in Muscat, Oman. She is also a passionate poet good orator, dancer and trained laughter yoga teacher.

Most of her works are inspired by the scenic beauty and culture of Oman and its people. Her love for Oman can be seen in her beautiful paintings. She paints in all mediums but loves to paint in Acrylic and more of contemporary arts.  She works on commission. Many of her art Works sale is to help underprivileged. Her art works are also a part of private collector’s collection which is a huge honour for her. And she is a member of Omani Society of Fine Arts for last 11 years.

She has exhibited her art work in many countries like Brunei, Oman, Russia, Indonesia, Uganda and Dubai etc. She has done many solo and joint painting exhibitions in Muscat and Internationally. Over the years, her passion for teaching art grew as well. She has conducted workshops for past 11 years at different community centres in Muscat and also taught art to children at Shell school at Sakhalin in Russia.

She runs a laughter yoga club for free for ladies. She also teaches mosaic work and loves silk painting too specially stoles of self-imaginative designs. Recently she was honoured as a judge and co-host of Alwar International Film Festival January 2020.

Her last big project was to participate in GRATITUDE 50, project (a masterpiece of Sultan Qaboos Portrait of 7 meters by 6 meters), represented by 19 countries artists, Her last solo exhibition was in December 4 until January 3rd 2020 where the media has applauded her work.

Grab a cup of coffee or tea and have a look at some of her master pieces


The recent lockdown has brought out more creativity and new skills on to her canvases. If you wish to get in touch with her for more updates please email her at shalinikumar46@gmail.com 


Wednesday, August 26, 2020

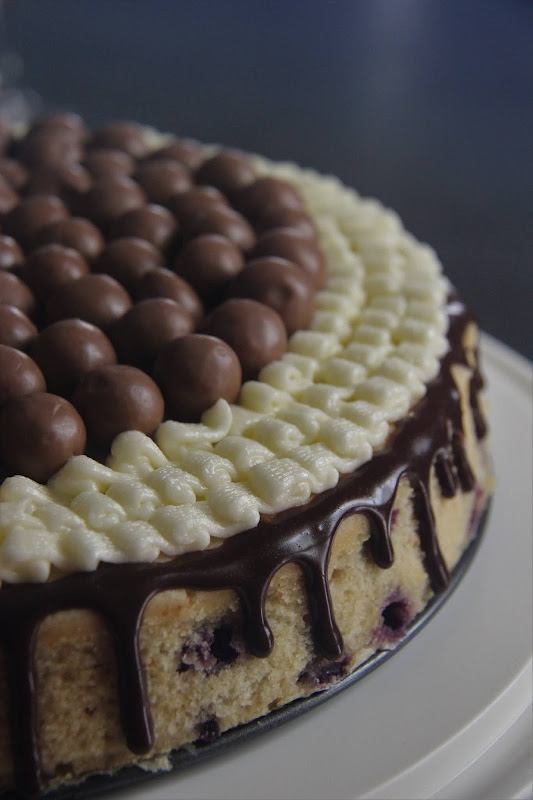
Lemon Blueberry Cake

This easy lemon blueberry cake is a burst of beautiful flavours and I call this a sunshine cake. Its moist, tender and bursting with lemon flavour and blueberries. It’s a great combo of flavours and a great show stopper dessert. I am going to share this recipe which didn’t fail me in my first shot. Try it out and do let me know how it turns out! This cake goes well with cream cheese frosting or buttercream. But I love it with Chocolate… because nothing can go wrong with chocolate!


This recipe is adapted from Sally’s Baking Addiction


Serves 10 to 12


Ingredients

1 cup softened unsalted butter
1 and 1/4 cups granulated sugar
1/2 cup light brown sugar
4 large eggs
1 Tablespoon vanilla extract
3 cups all-purpose flour 
1 Tablespoon baking powder
1/2 teaspoon salt
1 cup buttermilk
2 Tablespoons lemon zest
1/2 cup lemon juice (3 medium lemons)
1 and 1/2 cups blueberries, fresh or frozen
1 Tablespoon all-purpose flour (to coat blueberries)


Method:


Preheat oven to177°C. If you want to make a layer cake grease three 9-inch cake pans, line with parchment paper, then grease the parchment paper. I used one 12inch pan.

Make the cake: Using a handheld or stand mixer with a paddle attachment, beat the butter on high until creamy – about 1 minute. Add granulated and brown sugars and beat on medium speed until creamed, about 2-3 minutes. Add eggs and vanilla. Beat on medium speed until everything is completely combined, about 2 full minutes.

In a large bowl, whisk together the dry ingredients - flour, baking powder, and salt. Slowly add the dry ingredients to the wet ingredients. Beat on low speed for 5 seconds, then beat in the milk, lemon zest, and lemon juice, just until combined. Toss the blueberries with 1 tablespoon of flour and gently fold into the batter. Batter is extremely thick. So do not over-mix as over-mixing will lead to a dense textured crumb.

Spoon batter evenly into 3 prepared cake pans. If you are only using 2 cake pans or 1 cake pan, your bake time will be longer. Bake the three layers for about 21-25 minutes or until a toothpick inserted in the centre comes out clean. Remove from the oven and allow to cool completely in the pan before assembling and frosting.

You can frost it with cream cheese frosting or buttercream or chocolate. They all work well with this cake. 


Above pictures are copyrighted Tickled by Inspirations.


Wednesday, August 5, 2020

Coconut Baked Chicken

Any dish that is made in coconut milk is so flavourful. Today’s chicken dish is just succulent, high in flavor and has all the right spices in it! Everything depends on the thick creamy sauce. If you are a fan of Thai food or a fan of our authentic Kerala stew, then you should try this out.

Coconut Baked Chicken recipe is adapted from @swahilifood , do check her page for the original recipe which is equally good, among her other amazing recipes. Here is my version, it is super easy and a winner all the way!! I hope you get to try it out, trust me you will love it!


Ingredients:

1 whole chicken (or Chicken thighs)

For Marinade
Salt 1 teaspoon
Pepper powder 1 to 2 teaspoon
Turmeric half tsp
Chillie powder 1/2 teaspoon

To make the sauce
Butter 1 teaspoon
Oil 1 tablespoon
Cardamom 3 to 4
Cinnamon stick 2
Cloves 3 to 4
Peppercorns 1 tsp
Bayleaf 1 to 2
Minced ginger 1 tsp
Minced garlic 1 tsp
Chillie flakes 1 teaspoon
Turmeric 1 tsp
Coriander 2 tsp
Garam masala half tsp
Chillie powder or paprika 1 tsp
Coconut Milk 1 can
Chopped Coriander leaves - a bunch


Method:
Butterfly the chicken. Marinate the chicken well with the spices. Make sure there is enough salt. Fry the chicken in a pan with butter and oil on both sides of the chicken till the skin turns brown. Then keep aside the chicken in a baking dish.

To make the Sauce:
Remove the excess oil from the pan, leaving a little. Add the cardamom, cinnamon sticks, cloves, peppercorns and bayleaf and saute it. Then add the turmeric, minced ginger & garlic, chillie flakes, coriander powder and garam masala and saute it for a minute. Gradually add the coconut milk. I didnt have to add the whole can, I used 3/4th of it. Just warm it up and add chopped coriander leaves. Everything lies in the sauce. Taste and see of you need to add more spice. Pour this over the chicken. Cover the dish with foil and bake it at 200 degrees C for 45 minutes. Then remove the foil and bake it for another 10 minutes and serve it with bread, Chappati or rice.


Notes:
If you are using Chicken thighs the baking time will be less.


Friday, July 24, 2020

Roasted Cauliflower with Parmesan and Garlic


Roasted whole cauliflower with parmesan and garlic looks good on any table. Whole baked cauliflower can be a vegetarian main dish or a healthy low carb side dish. Its quick to make and high in flavour and no work needed! And it is drizzled with garlic parmesan sauce to enhance flavour. This is my favourite go-to cauliflower recipe and I hope you enjoy making it!


Here is the recipe:


Ingredients:

1 small or meduim head Cauliflower
1/3 cup Olive Oil
3 cloves crushed garlic
1/4 cup grated parmesan cheese (divided)
1 tsp dried basil
1 tsp dried parsley
1 tsp dried thyme
1/2 tsp or more Sea Salt 
1/4 tsp Black pepper
1/2 tsp Chillie flakes

Method:

Preheat the oven to 400 degrees F (200 degrees C).

In a small bowl, make the garlic parmesan sauce. Whisk together the olive oil, minced garlic, 2 tablespoons (28.3 grams) grated Parmesan (half of the total amount), chillie flakes, basil, parsley, thyme, salt, and black pepper.

Place the trimmed cauliflower head upside down (core side up) onto a dutch oven or a baking try. Drizzle half of the sauce over the cauliflower, tilting it to let it drip down the core and all around. Flip over and drizzle the remaining sauce over the top. Use a pastry brush to brush on any that had dripped down to the pan or didn't spread well.

Bake for 35-45 minutes, until the cauliflower is tender and pierces easily with a skewer, knife or fork.

Sprinkle the top of the cauliflower with the remaining 2 tablespoons grated Parmesan cheese. Continue to bake for about 5 minutes, until the cheese is browned.


Above picture is copyrighted Tickled by Inspirations


Thursday, July 16, 2020

Nutella and Orange Swirl Buns


I recently discovered that Nutella and Orange are a deadly combination and super addictive. These buns are so delicious and fun to make… and they are so pretty to look at! The dough for this recipe was so soft and moist and it came out so perfectly! And I must say that it is easy to make even though the process seems long. Please do try. This is a huge hit in our home and I look forward to baking more of these soon...  

This recipe is adapted from Anna Banana and I added my twist to it... 


Yield : 8 to 12 buns depending on the size

Ingredients
·      60 g unsalted butter cubed
·      250 ml milk 
·      15gm yeast
·      500 gm flour
·      100 gm caster sugar
·      1 egg
·      1 tsp salt
·      Nutella 5 to 6 tablespoon or more (please be generous with it!)
·      Orange Zest 1 to 2 tablespoon
Instructions

1.    Heat the milk in a small saucepan until lukewarm. If you are using dried active yeast, transfer about 150ml of lukewarm milk into separate jug and add 1 tsp of sugar. Stir to dissolve sugar and add active yeast. Stir it and set aside for 15 minutes to activate it. 
2.    Add cubed butter to your lukewarm milk, swirling the saucepan every now for the butter to melt and set it aside.
3.    In a bowl of a freestanding mixer fitted with hook attachment, mix the flour, sugar and salt. Once its mixed, add yeast, egg, milk and butter mixture. Mix together for 2 minutes on low speed. Increase the speed to high and mix for further 6-8 minutes until the dough is not sticking to the sides of the bowl. Transfer the dough onto lightly floured surface, roll into a ball and place in a clean, lightly oiled bowl. Cover with clingfilm and let it rise somewhere warm for 2 hours or more until its doubled in size.
4.    Remove the dough from the bowl into a lightly floured surface. Gently knock out the air from it and stretch it into rough rectangle shape. Using a rolling pin, roll the dough into large rectangle.
5.     The longer edge of the rectangle should be facing you and spread the Nutella over 2/3 of the rectangle, leaving 1/3 clean. (please be generous with the spread). Then sprinkle the orange zest over the Nutella spread. Fold the clean part of the rectangle towards the middle, then fold the other end of the dough on top of that. Using a rolling pin, roll it over the rectangle to flatten it out and to stretch the dough a bit. (please head to my Instagram page @tickled_by_inspirations, to see the process, it is saved in the highlights)
6.    Use a pizza cutter or a sharp knife to trim the edges of your rectangle. Slice the rectangle in half, then each half in half again, and again until you have 8 long strips of the dough. Starting at one end of the strip, rolling, tucking the end underneath. Place the rolled bun into baking tray lined with some baking parchment. Repeat the same process with all of the remaining strips.
7.    Cover the buns loosely with some cling film and set them aside to prove for at least an hour.
8.    Preheat the oven to 175C. Bake in the middle shelf of the oven for about 18 minutes or until golden brown and risen. Enjoy! Eat it warm.

Tips:
You can freeze these buns
You can sprinkle hazelnuts on the buns before baking for a nutty texture.

I hope you will enjoy baking these beauties and do drop a mail or a comment and let me know how it turns out!! Have a great and safe weekend!


Above pictures are copyrighted by Tickled by Inspirations


Thursday, June 18, 2020

Bow to Bao Buns


Bao buns are soft, fluffy and pockets of steamy goodness. They go perfect with any meat or vegetables like mushrooms with pickled vegetables, fresh herbs and your favorite sauces. It can be served as a side or as the main meal itself.... And what I love about this bread is that it doesn’t collapse under the pressure of steaming. These buns just made me swoon and are a family favorite now. These are easy to make with readily available ingredients. Try it out and trust me, you will keep making it!


Yield 14 to 16 buns

INGREDIENts
·         1/3 cup warm water
·         1/2 cup warm milk
·         1 tbsp active dry yeast
·         4 tbsp sugar, divided half
·         2 tbsp vegetable or canola oil
·         2 1/2 cups all-purpose flour
·         1/2 tsp baking powder
·         1/4 tsp salt

INSTRUCTIONS
1.       Combine warm water, milk, active yeast, sugar and oil. Whisk to let yeast and sugar to dissolve then let it sit for 5 to 10 minutes until the yeast activate.
2.       Meanwhile in a stand mixer and a bowl, combine flour, sugar, baking powder and salt. You could make with your hand too if you prefer.
3.       Pour the wet ingredients to the dry ingredients. Blend on a low speed to slowly incorporate all the ingredients together then on medium speed until it becomes a dough shape. Keep on kneading for 3 to 4 minutes on medium speed. The dough should be elastic and really soft and not stick to your fingers or on the mixing bowl.
4.       Once the dough is ready, shape it into a ball and place it back to the bowl, cover with a plastic wrap and let it rise in a warm place until it becomes triple size, about 2 hours. Let it sit for longer if needed as it had to rise well. 
5.       Place the raised dough on a working surface and roll it out to 1/4-inch thickness. Sprinkle flour only if you need to. Cut the dough 3 1/2-inch circle with a ring mold or glass or a wine glass. This recipe will make 14 o 16 baos.
6.       Lightly brush or spray oil on one surface of the baos and fold in half as a half moon shape. Gently press each bao with a roller and place on a parchment paper or coffee filter lined steamer so that it won’t stick to the bottom. Cover with a lid and let it rest for additional 30 minutes.
7.       Meanwhile get your steamer ready. Carefully place the steamer with the baos on top of boiling water wok/pot. Make sure water is not touching the baos. Cover and steam for 8 to 12 minutes. Please be careful when you open the lid of the steamer. You can serve this bao as a side or serve with a filling like I did!
I hope you all will enjoy making these and do keep me posted if you try. Have a great weekend everyone!


Above pictures are copyright to Tickled by inpirations