Wednesday, October 27, 2021

Tea Time with Alaknanda Kumar

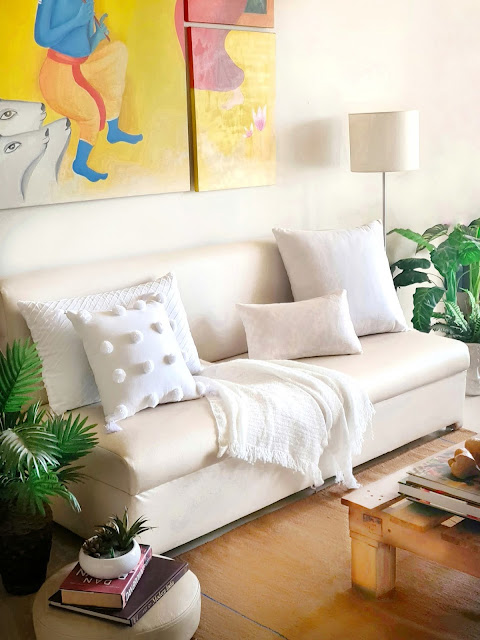
 Alakanda Kumar, a creative consultant by profession, is making a mark in the world of décor topped with her passion for photography. I have been following her work for a while. It is absolutely pure joy to see her work and experiment with colours, vignettes, creative ideas and vignette. If you follow her work you will also find her home so tastefully done up. Every corner in her home has a story to tell. Her aesthetic touch is what keeps her work unique and her eye for photography is an extension of all the beauty she sees around.


To know more about what drives Alakanda, please read the interview where she speaks about design, culture, interiors, textures and more

1. Tell us a bit about yourself.

 When not satiating the shutterbug in me, I find myself juggling between my job as a creative consultant and chasing my preteen for homework. Born in a Konkani-Managlorian family, I spent a fair share of my childhood in Gujarat (which had a big influence on my hobby), before moving to Mumbai. Though a science graduate, I pursued my passion for arts and built a career in graphics and design.


2. Where do you get inspiration to do up your home?

 Growing up in Gujarat, the vibrant colours and rich textures that embodies its culture was etched into my mind. Having a strong fascination for bold and contemporary Indian art intrigued me to try my hands on it. And that's how painting became one of my hobbies. During my early years in 80s when there was no Pinterest, home interior TV shows and art and decor magazines served as the greatest source for an ultimate design. Today we have inspiration just a click away. 


3) What's your favorite décor style?

 I have always found myself trying to strike the right balance between Indian and contemporary styles. As much as I adore white and open spaces, I tend not lean towards minimalism or even maximalism. That said, I keep experimenting with different styles.


 4) What's your favorite décor element or accent in your home?

 It’s hard to zero-in on a single element. Candles and cushions are like wine and cheese; they complement each other so perfectly that you’d be hard-pressed to leave them out. Another element that I swoon over are mirrors. A perfectly placed mirror doesn’t just add glamour and pique interest, but accentuates a sense of space and maximizes light. Thanks to my penchant for pottery, I always find myself styling my space with earthy accents like vases and figurines.


5) Do you have a favorite corner or space in your home? And why is it your favorite?

 As much as we adore our home, we all have that corner where we could retreat to our little cocoon after an exhausting day. Mine is a space in the living room that is our reading nook. The beauty of this corner is that I could be lost in a book or in the tunes my son plays on his piano and not strays away from what’s happening around in the house.


6) Any tips or advice for décor lovers out there?

 - I believe that your home is a reflection of your personality, and if one starts understanding this, every nook and cranny of your home will brain out the artist in you.

 - Before discarding any old furniture or accent, think if it can be repurposed. An old, rickety wooden window could be an excellent wall piece (I tried that ;) )

 - If your place is too cluttered, one’s mind would be overwhelmed with all the elements, and hence, my advice would be to do less with more.


 Thank you so much for sharing your journey and sharing some amazing tips of home décor. Looking forward to seeing more inspiring work from you.

If you wish to see more of her work and get more updates, please click here to follow her on Instagram.

Stay tuned for more tea times stories!!


All the above pics are by Alaknanda Kumar


Saturday, August 7, 2021

Artist of the Month: Samantha Mathew


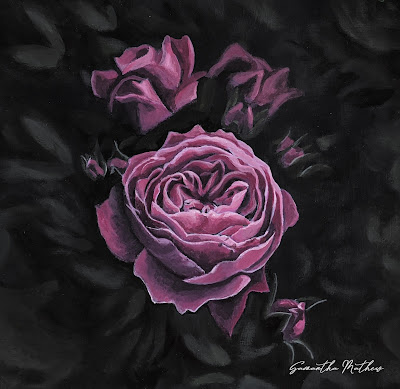
Samantha Mathew is a talented architect, based in the US, who rekindled her passion for art while decorating her home. She is a self- taught artist and she was born with creativity in her blood. Her paintings have a story to tell and reflect her interest in nature, landscape and everything vintage. I found her work aesthetic and appealing to look at. Her work draws your attention to the beautiful details and the gorgeous calming colours she uses. She sees the beauty of little details and adds to her work that exudes joy with a magical touch.  


Have a look at her beautiful paintings and let’s hear more from Samantha herself who talks about her journey and her inspiration


Be Still


Radiance

Come & Dine With Me


Bright & Beautiful


Blooms of Hope


I'll be with you always


Dressed in Bloom


Tell us a bit about yourself.

I’m Samantha, an architect by training and I live in Austin with my amazing husband, Jeff and two precious girls who are now 4 and almost 2. I’ve lived most of my life in Oman and some in India (I’m originally from Kerala) and been in the US since 2013.

How did your journey as an artist begin? Did you have any formal training or is it self-taught?


I’ve always loved to sketch, paint and dabble in anything creative and am extremely passionate about design! I did not have any formal training as an artist, except for the standard art class in school. But those classes laid the foundation and taught me the basics in various sketching and painting techniques.  I used to also hold onto picture books with pretty illustrations in it, and would try and paint them when I had the time. I realised early on that God had blessed me with a creative gene as I received plenty of affirmation from my art teachers, friends and family. My art teacher was highly invested in anything I produced, displaying them in his room, around the school and at art exhibitions. But I only ever thought of art as a hobby. I went to architecture school, pursued my goals of becoming a licensed architect and hardly picked up a paint brush for anything unrelated to school or work for the next 10 years.


When Jeff and I moved into our first apartment, I was very excited to do some decorating and make it feel more like home. I started looking for some meaningful art for our stark lifeless walls. Not finding what we wanted in our budget, I decided to paint a few myself. And THAT rekindled the old lost passion once again! I did a couple for our own home, and then happily jumped at opportunities to do a few more for family and friends. They were positively thrilled. 


As the 2020 pandemic began, I chose to take a break from work to be fully available to my little ones. Though I've been blessed to have this opportunity to spend so much time with them, I began to feel drained and was in desperate need of a creative outlet - something to occupy myself with on a flexible schedule - and I found therapy behind the easel again. If I’m not painting, I’m either organizing or designing spaces.


How would you describe your art style?


This is a hard one. Honestly, I’m not very good at identifying different art styles but I do know that I am naturally more drawn to painting landscapes and objects in a realistic way toning down the colors to a soft, earthy palette. I love the rich character of vintage art and sometimes like to dye my paper or canvas to recreate that look, before I paint on it.


What's your inspiration for your art work?


Painting is therapeutic to my soul and draws me closer to God, the Creator of all things beautiful. I draw a lot of inspiration from nature- from tiny delicate flowers to a beautiful cloudy sky. I love being able to study and capture on paper in my imperfect way, glimpses of His perfect creation.  I also have a thing for old buildings, interesting doorways, arches, stone masonry, cobblestone streets and anything covered in blooms! I work primarily with acrylics, watercolours and charcoal, experimenting with light, shadow, fluidity and texture as I go.


What is the most challenging aspect about your work?


Since I get to take out my brushes only when the kids are asleep, I get just a few hours in a day to paint and I try to make the most of it. Acrylics dry very quickly, so I’m always trying new ways to keep them wet longer, so I don’t waste too much paint between painting sessions.

Making time to pursue creativity amidst the demands of motherhood gets challenging at times, but I just take it one day at a time.


What is your creative process like? and what keeps you motivated?


My head is always brimming with ideas for future paintings and collections and so I write these ideas down whenever I have an inspiring moment.  I usually listen to my favourite podcasts, music, or an audio bible and it keeps me focused, relaxed and inspired as I work. I am most productive and motivated in the early morning hours, when the whole house is sleeping and it’s just me and my canvas.


Do you commission different projects? And how can people purchase your paintings?


Yes  I do! I’m currently taking one commission a month and you can either DM me on Instagram @samanthamathew.studio or contact me at samanthamathewstudio@gmail.com about it and I will be happy to bring your vision to life! As of now, I only ship to places within the US. 

I also sell my work on www.etsy.com/shop/SamanthaMathewStudio or do occasional sales on Instagram itself.


What is your favourite art piece that you have done till date?


Ah, another tough one! But if I had to pick, I would say that the “Come and Dine with Me” painting hanging in our living room is my favourite. It was the first painting I did, after 15 years and the first time I tried working with acrylics. 

I just love this scene of the risen Christ, appearing to His weary disciples who were out the entire night fishing, with no luck whatsoever and inviting them to a breakfast that He'd just prepared for them. I didn’t have a reference image for this piece and I just love how it all finally came together.


Any tips or words of wisdom to aspiring artists who want to pursue a similar career.


I don’t consider myself the best person to give much advice here as my path is pretty unconventional for an aspiring professional artist. But as in any field, the only way to get better at something is with lots of practice! So make time to pursue creativity- if it is through sketching or painting, do a little everyday even if you don’t feel particularly inspired or stimulated. 

And most of all, believe in yourself and in your work!


Thank you so much Samantha for sharing your inspiring journey with me and my readers and we look forward to seeing more of your work.


Stay tuned for more artist inspirations in the coming weeks!


Sunday, June 27, 2021

Tea Time with Meenakshi Kapoor

Hi everyone… I know I have not been consistent with my blog as I got sidetracked with a few projects in hand and pursuing my passion and learning in food photography. Please click here to see my work and to know more. I am back now with a new series called “Tea Time Series” where I will feature and introduce a creative whose work I follow and admire and I am super excited about this.

Kick starting the Tea Time series with Meenakshi Kapoor, a Mumbai based interior designer, who is the creative force behind the inspirational blog, called “Behind that House”, who took Instagram by storm with her mind blowing reels, beautiful posts and styling videos. I have been following her work for a long time and I have seen her grow consistently and taking up new challenges when it comes to home décor styling. Her Insta blog is truly a visual décor therapy.

The most striking aspect about her work is her unique, beautiful and elegant styling tips which always have a pop of gorgeous seasonal blooms and plants. Her easy to do DIYs and her simple tips on décor are another striking feature of her work, which gives wings to your imagination when it comes to home décor. She always aims to provide a fresh perspective to her audience when it comes to styling and DIY projects.

So grab a cup of tea and let’s get to know more about Meenakshi


Tell us a bit about yourself.
I studied Chemistry and computer networking and worked at The Taj for few years before I realized my inclination and fascination for furnishing fabrics and interiors. So after a long hiatus in my career while I raised two beautiful children and designed 4 different homes.... I joined DA designs as an interior designer and started blogging about my passion for styling and decor simultaneously

Where do you get inspiration to do up your home?
I find inspiration in the everyday, when I take a walk or when i travel. It could be a leaf a flower a pretty window a medieval arch or even a tiny coconut fallen from a tree or just about anything.


What's your favorite décor style?
I don’t have a favorite style. There’s always something to learn and explore about every style that is defined in books and there’s so much to experiment with and evolve from. I feel it’s an ongoing process and mixing styles along with adding unique pieces of art to create something new each time is what keeps me ticking.


What's your favorite décor element or accent in your home?
I love my plants the most as they always add life to any corner or space.


Do you have a favorite corner or space in your home? And why is it your favorite?
Yes, my balcony. It’s the perfect spot to unwind and switch off.


Do you have any tips or advice for décor lovers out there?
Don’t go overboard when you go shopping for furniture or decor. You will definitely be tempted to buy furniture from one store as it’s the most convenient thing to do but allow yourself to explore and play with different styles. Also with decor accents have fewer but unique pieces of accessories that speak to you. Creating vignettes is a great way to start styling corners of your home.


 Thank you so much for sharing your journey and tips with me and my readers! We look forward to more design and home décor styling tips from you!


Please click here if you wish to get in touch with her and follow her amazing work.

Stay tuned to the Tea Time Series!!! Stay safe!


The above pictures are copyrighted. Please do not reuse.


Saturday, May 1, 2021

Easy Basbousa Recipe (Semolina Cake)

The Covid situation and the choas around left me so uninspired lately... Trying to be sane and making sure that we all stay afloat , not getting sucked into it is not easy... I hope everyone reading this is safe and taking good care and precautions. Let's all continue to move forward in hope that there will be better days ahead, so please find strength in the wait...

In the midst of this chaos allow me to distract you with a simple recipe for today.


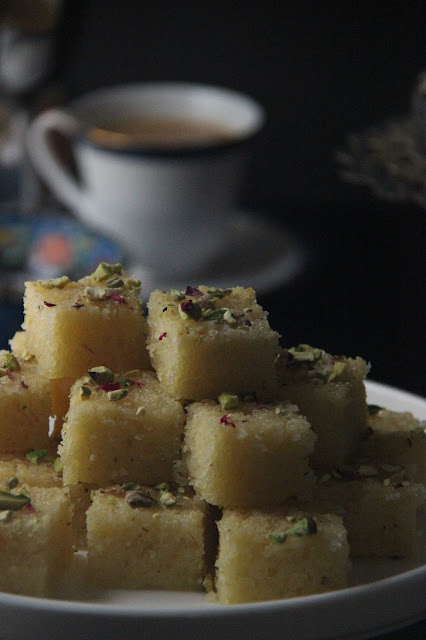
Basbousa Cake is a well known middle eastern dessert made with semolina, flour, coconut, yogurt and nuts, soaked in a flavorful simple syrup. The coarse semolina flour gives the cake its signature sandy texture, it is super moist and has a melt-in-your-mouth texture. It’s a one bowl recipe and a great one to bake with your kids or family. I love recipes with coconut flavor and texture and this is one of my current favorite and I hope you get to try it out.


Ingredients

Semolina Cake

·      2 cups semolina

·      1 cup plain yogurt

·      1 cup granulated sugar

·      1/2 cup ghee, melted

·      1/2 cup unsweetened coconut flakes

·      2 teaspoons baking powder

·      2 teaspoons vanilla extract

·      1 teaspoon salt

·      3 tblsp flour

·      3 eggs


Simple Syrup:

·         1 1/4 cup sugar

·         1 1/4 cup water

·         2 teaspoons vanilla extract


Toppings:

·         1/3 cup chopped nuts (sliced almonds or chopped pistachios or hazelnuts) I used Pistachios


Instructions

1.      Preheat the oven to 200C.

2.      Line a 10" cake plate with a baking paper circle cut to size and brush all the edges with a little melted ghee. You can even bake this in a brownie tin or rectangular baking tin.

3.      In a large bowl, whisk egg and sugar till combined. Then add yogurt and whisk a bit. Then add to it ghee and continue to whisk and then add semolina, coconut and flour, salt and baking powder to the batter and fold it well with a spatula

4.      Mix until just combined. Do not over mix or your cake will be tough.

5.      Tap the cake pan gently on the table to ensure there are no cake bubbles present and everything is even.

6.      Bake on the centre rack of the oven for 15 minutes.

7.      Move the pan to the top rack and bake for an additional 15 to 20 minutes, or until the centre of the cake is set and it is starting to turn golden brown.

8.      During the last 10-15 minutes, prepare the simple syrup. Combine the sugar and water and in a small saucepan and bring to a boil. Reduce heat to a simmer and allow it to simmer for 10 minutes.

9.      When the cake is done, remove from oven and Pour the hot syrup over the hot cake.

10.  Cover the pan with foil and allow it to sit for at least half hour to soak in the syrup. Once it’s soaked sprinkle with chopped nuts and serve.


Tip: You can flavor the simple syrup using either 2 teaspoons vanilla extract or 2 teaspoons orange blossom water or 2 teaspoons rose water, or 1/2 of a cinnamon stick or crushed cardamom.


Above pictures are copyrighted Tickled by Inspirations


Saturday, April 3, 2021

Hot Cross Buns Recipe and Happy Easter

There’s nothing better than the smell of fresh homemade Hot Cross Buns wafting through your kitchen. Warm bread + fragrant spices = heaven! The best part is that they are easier to make than you think and taste heavenly. I hope you get to try this out! Its so therapeutic to bake these gorgeous buns! You can even try out without piping the cross on these buns and skip that step all together.

I know nothing much has changed since last Easter... its around the same time when Covid started and its been a year... and we are still fighting this pandemic... and we all should be grateful that we have come this far.

Easter reminds us that hope must never be lost for as dark as the road may seem, there always lies light at the end of it. I hope this Easter will fill your home with peace, faith and joy! Wishing you all a Happy and Blessed Easter!


Here is the recipe to make these hot cross buns:


INGREDIENTS

Buns

·         2 packets dry, instant or rapid rise yeast, 1/2-oz. or 14 grams (just over 1 tablespoon)

·         1 1/2 cups warm milk (375 ml)

·         3/4 cup superfine sugar (130 grams)

·         4 1/2 cups bread flour or plain/all purpose, (645 grams) PLUS up to 1/4 cup extra if needed

·         2 teaspoons  mixed spice

·         1/2 teaspoon salt

·         1 cup raisins, (5.4-oz. or 155 grams)

·         zest of an orange 2 tablespoons

·         1 large egg 

·         1/4 cup butter, melted and cooled slightly (2.1-oz. or 60 grams)

To draw the Cross

·         1/2 cup all purpose or plain flour, (2.6-oz. or 75 grams)

·         5 tablespoons warm water

·         1/2 teaspoon pure vanilla extract

Glaze

·         1 tbsp jam, (orange marmalade or apricot jam – I used orange)

·         2 teaspoons boiling water


Method

1.       Mix yeast, milk and 2 teaspoons of the sugar in a small bowl to activate. Set aside until frothy on top, about 3-5 minutes.

2.       In a large bowl and combine flour, remaining sugar, all spice and salt. Give those dry ingredients a light whisk to combine, then add in the raisins and orange zest.

3.       Create a well in the centre of the dry ingredients; pour in the yeast, cooled melted butter and egg.

4.       If you are using a standmixer, Mix until a smooth elastic dough forms, about 5 minutes on low speed (setting 2). Add extra flour, 1 tablespoon at a time while mixing, ONLY if needed, until the dough JUST pulls away from sides of bowl (not too sticky). Or if you are using your hand to mix, knead the dough for about 10 minutes.

FIRST RISE

Lightly oil the same mixing bowl you worked with. Place dough inside bowl, cover with plastic cling wrap and place a dry tea towel over the top. Leave in a warm place to prove for 1-2 hours, or until doubled in size.

Shape into Buns

1.       Line a deep 9 x 13-inch (31cm x 23cm) baking tray with baking paper. You want a piece long enough to create a slight over-hang for easier lifting once baked. Set aside.

2.       Remove cling wrap and punch down dough with fist to deflate and knock the air out. Transfer dough to a clean, lightly floured work surface.

3.       Knead dough for an additional minute or two to get remaining air out. Shape dough into a log and divide into 12 equal pieces (each piece should weigh about 4-oz. or 116-119 grams). Briefly roll each piece into a ball, evenly spacing them out on the tray as you go into rows of 3 x 4.

SECOND RISE

1.       Preheat oven to 180°C.

2.       Cover tray with plastic wrap; place dry tea towel over the top and leave in a warm place for an additional 30 minutes, or until doubled in size.

Pipe the Crosses

  1. Mix flour and water to a thick-ish paste (like a thick pancake batter)
  2. Grab a sandwich-sized ziplock bag. Snip corner to measure a 3mm hole (0.1-inch). Spoon paste into bag; carefully press the air out and SEAL the top. (Test hole is big enough by squeezing out some paste into a bowl first. If you can create a small straight line, you're ready to make your crosses. At this point you can add a little extra water to the paste ONLY IF needed).
  3. Remove cling wrap and slowly pipe crosses onto buns. You want some paste to fall into and hug each roll/crevice so while they bake and rise up, the crosses don't break).

Bake

Place buns into preheated oven and bake for 22-25 minutes, or until deep, golden brown on top.

Glaze

1.       Transfer buns to a wire cooling rack.

2.       Mix jam  and boiling water together in a small bowl. Brush buns over with glaze, then leave to cool. 

3.       Allow to cool to just warm to the touch before serving.


Image copyright Tickled by Inspirations